468x60

giovedì 3 dicembre 2015

XSIBackup - Free Backup software for VMware ESXi

XSIBackup is an open source software perfect for backup and replication of VMWare ESXi vSphere virtual machines to datastore or differential over IP.

Main features:
  • Hot backups, no downtime
  • No agents
  • Self capable, self contained, no dependencies
  • Runs in the hypervisor host
  • Crontab programmable
  • Compatible with ESXi 5.1, ESXi 5.5 & ESXi 6.0
  • Free and Open Source

Official project page on Sourceforge for doc and download
http://sourceforge.net/projects/xsibackup

XSIBackup - software di backup gratuito per VMware ESXi

XSIBackup è un software open source ideale per il backup e la replica delle macchine virtuali VMWare ESXi vSphere su datastore o differenziale su IP.

Main features:
  • Hot backups, nessun downtime
  • No agents
  • Autonomo, senza dipendenze
  • Runs in the hypervisor host
  • Crontab programmabile
  • Compatibile con ESXi 5.1, ESXi 5.5 e ESXi 6.0
  • Free e Open Source

Pagina ufficiale del progetto su Sourceforge for doc e download
http://sourceforge.net/projects/xsibackup

venerdì 28 agosto 2015

How to run a shell script at startup on Debian

The script file is in /etc/init.d/myscript

*** begin myscript file ***
#!/bin/bash
# /etc/init.d/myscript
#
### BEGIN INIT INFO
# Provides:          myscript
# Required-Start:    $remote_fs $syslog
# Required-Stop:     $remote_fs $syslog
# Should-Start:      $network $time
# Should-Stop:       $network $time
# Default-Start:     2 3 4 5
# Default-Stop:      0 1 6
# Short-Description: Start myscript
# Description:       startup myscript
#
### END INIT INFO
#

/path/to/myscript

*** end myscript file ***

As root user we can use chkconfig to enable or disable the script at startup:
chkconfig --list myscript
chkconfig --add myscript

Come eseguire uno shell script all'avvio di Debian

Il file dello script è in /etc/init.d/myscript

*** inizio file myscript ***
#!/bin/bash
# /etc/init.d/myscript
#
### BEGIN INIT INFO
# Provides:          myscript
# Required-Start:    $remote_fs $syslog
# Required-Stop:     $remote_fs $syslog
# Should-Start:      $network $time
# Should-Stop:       $network $time
# Default-Start:     2 3 4 5
# Default-Stop:      0 1 6
# Short-Description: Start myscript
# Description:       startup myscript
#
### END INIT INFO
#

/path/to/myscript

*** fine file myscript ***

Come utente root possiamo usare chkconfig per abilitare o disabilitare lo script allo startup:
chkconfig --list myscript
chkconfig --add myscript

How to make a new disk usable on Debian

view devices:
# fdisk -l

device: /dev/vdb1

create partition:
# cfdisk /dev/vdb

format:
# mkfs.ext4 /dev/vdb1

UUID:
# blkid

/dev/vdb1: UUID="f6c741e8-6595-4952-9c62-0c82b6155700" TYPE="ext4" PARTUUID="8811bc88-b63c-4a74-8fd5-3fa33f9d2454"

# nano /etc/fstab
add a line like the following
UUID=f6c741e8-6595-4952-9c62-0c82b6155700 /var/www        ext4    errors=remount-ro 0       1

create mount point
# mkdir /var/www

temp mount
# mount /dev/vdb1 /mnt

umount
# umount /mnt

Come rendere utilizzabile un nuovo disco su Debian

visualizza i device:
# fdisk -l

device: /dev/vdb1

crea partizione:
# cfdisk

formatta:
# mkfs.ext4 /dev/vdb1

UUID:
# blkid

/dev/vdb1: UUID="f6c741e8-6595-4952-9c62-0c82b6155700" TYPE="ext4" PARTUUID="8811bc88-b63c-4a74-8fd5-3fa33f9d2454"

# nano /etc/fstab
aggiungi una riga come la seguente
UUID=f6c741e8-6595-4952-9c62-0c82b6155700 /var/www        ext4    errors=remount-ro 0       1

crea punto di mount
# mkdir /var/www

mount temporaneo
# mount /dev/vdb1 /mnt

umount
# umount /mnt

venerdì 7 agosto 2015

Monstroid Wordpress Theme

A great Wordpress Theme ready for any project

Monstroid is innovative, it’s been created to help you build any type of website, thanks to a combination of multiple child themes and the inclusion of a powerful front end, drag and drop page builder tool.

Monstroid has been built to run on the Cherry Framework, but unlike other themes for this framework, this one is packed with a whole host of features and tools to help you build the website you’ve always wanted.

Unlike regular WordPress themes, Monstroid has been created to help you build a wide range of websites, rather than just one type of site.

Child Themes
In the Monstroid ecosystem, the ability to build these different types of websites is delivered by a library of child themes, known here as topics. These topics are installed alongside Monstroid and the Cherry framework, allowing you to apply a purpose built design to the features of the Monstroid theme.

Features as Plugins
To help the theme achieve much of its functionality, Monstroid requires a significant number of plugins in order to run. In the past developers might have been tempted to bundle all this extra code into the theme files. However, by supplying these features as separate plugins, design and functionality are kept separate. This approach helps to prevent theme lock-in, and is a welcome development in the world of WordPress themes.

Find out more on the official website

Monstroid Wordpress Theme

Un eccezionale Wordpress Theme pronto per qualsiasi progetto

Monstroid è innovativo, è stato creato per aiutare a costruire qualsiasi tipo di sito web, grazie ad una combinazione di più temi figli e l'inserimento di un potente strumento di front-end, il costruttore di pagine drag and drop.

Monstroid è realizzato sul Cherry Framework, ma a differenza di altri temi è ricco di tutta una serie di funzioni e strumenti per aiutare a costruire il sito web che hai sempre voluto.

A differenza dei normali temi WordPress, Monstroid è stato creato per aiutare a costruire una vasta gamma di siti web, piuttosto che un solo tipo di sito.

Child Themes
Nell'ecosistema Monstroid, la capacità di costruire questi diversi tipi di siti web viene conseguita da una libreria di temi minori, noti come topics (argomenti). Questi topics sono installati a fianco Monstroid e del Cherry Framework, consentendo di applicare un apposito design alle caratteristiche del tema Monstroid.

Caratteristiche come Plugin
Per aiutare il template a raggiungere gran parte della sua funzionalità, Monstroid richiede un numero significativo di plugin per essere eseguito. In passato gli sviluppatori avrebbero potuto essere tentati di raggruppare tutto questo codice aggiuntivo nei file del tema. Tuttavia, fornendo queste caratteristiche come plugin separati, design e funzionalità sono tenute separate. Questo approccio aiuta a prevenire il lock-in, ed è uno sviluppo positivo nel mondo dei temi WordPress.

Scopri di più sul sito ufficiale

venerdì 10 luglio 2015

Setting up a LAMP Server on Debian

Great HOWTO for setting up a LAMP server on Debian:
https://www.linode.com/docs/websites/lamp/lamp-server-on-debian-7-wheezy

giovedì 9 luglio 2015

Upgrade da Debian-7 Wheezy a Debian-8 Jessie

Vediamo come eseguire un upgrade di Debian Linux da Wheezy a Jessie stable

Upgrade Completo del Sistema corrente
apt-get update
apt-get upgrade
apt-get dist-upgrade

Upgrade a Debian Jessie
sed -i 's/wheezy/jessie/g' /etc/apt/sources.list
apt-get update
apt-get upgrade

Durante l'aggiornamento è possibile che venga data la possibilità di riavviare manualmente o automaticamente i servizi attualmente in esecuzione. La strategia consigliata è quella di fare il riavvio manuale in quanto fornisce una maggiore flessibilità. Se si esegue il servizio SSH vi sarà anche data la possibilità di disabilitare l'accesso root SSH. Che cosa significa, che se si sceglie di "SI" non sarà più possibile fare login SSH come utente root.

Se non ci sono problemi con l'aggiornamento dei pacchetti siamo pronti ad eseguire un aggiornamento completo del sistema da Debian Wheezy a Debian Jessie.
apt-get dist-upgrade

Dopo l'upgrade è raccomandato un reboot del sistema:
reboot

Controllare l'upgrade:
hostnamectl

Upgrade from Debian-7 Wheezy to Debian-8 Jessie

Lets look how to upgrade Debian Linux from Wheezy to Jessie stable

Fully Upgrade current System
apt-get update
apt-get upgrade
apt-get dist-upgrade

Upgrade to Debian Jessie
sed -i 's/wheezy/jessie/g' /etc/apt/sources.list
apt-get update
apt-get upgrade

During the upgrade you may be given an option to manually or automatically restart any currently running services. The recommended strategy is to do manual restart as it provides more flexibility. If you are running SSH service you will be also given an option to disable SSH root access. What it means, that if you opt to "YES" you will no longer be able to SSH login as root user.

If there are no issues with the package upgrade we are ready to perform a full system distribution upgrade from Debian Wheezy to Debian Jessie.
apt-get dist-upgrade

After the upgrade it is recommended to reboot your system:
reboot

Check your upgrade:
hostnamectl

Fix Errore "...no public key available..." su Debian Wheezy

Se lanciando un apt-get update sul tuo Debian Wheezy ottieni un errore simile al seguente:

W: There is no public key available for the following key IDs:
7638D0442B90D010

Ecco cosa fare:
apt-get install debian-keyring debian-archive-keyring
apt-get update

Howto Fix Error "...no public key available..." on Debian Wheezy

If when running an apt-get update on your Debian Wheezy you are getting an error similar to this one:

W: There is no public key available for the following key IDs:
7638D0442B90D010

Here is what you should do:
apt-get install debian-keyring debian-archive-keyring
apt-get update

giovedì 28 maggio 2015

Installare Tomcat 8 in Debian 8 dal Repository

Debian 8 ha un package stable per Apache Tomcat 8. Per installarlo eseguire questo comando:
apt-get install tomcat8

Dopo averlo installato, se si sta usando Oracle Java 8, non partirà a causa di un bug su /etc/init.d/tomcat8, perciò modificare questo file ed aggiungere questa riga dentro la funzione find_jdks()
/usr/lib/jvm/java-${java_version}-oracle

Install Tomcat 8 in Debian 8 via Repo

Debian 8 has stable package for Apache Tomcat 8. To install it just execute this command:
apt-get install tomcat8

After installing it, if you're using Oracle Java 8, it will not start because of a bug on /etc/init.d/tomcat8, so edit this file and add this line on the function find_jdks()
/usr/lib/jvm/java-${java_version}-oracle

Installare Oracle Java 8 in Debian dal Repository

Per aggiungere il repository  WebUpd8 Oracle Java PPA ed installare Oracle Java 8 in Debian, usare i seguenti comandi:
echo "deb http://ppa.launchpad.net/webupd8team/java/ubuntu trusty main" | tee /etc/apt/sources.list.d/webupd8team-java.list
echo "deb-src http://ppa.launchpad.net/webupd8team/java/ubuntu trusty main" | tee -a /etc/apt/sources.list.d/webupd8team-java.list
apt-key adv --keyserver hkp://keyserver.ubuntu.com:80 --recv-keys EEA14886
apt-get update
apt-get install oracle-java8-installer

Tutto qui, Oracle Java 8 dovrebbe ora essere installato e si dovrebbero ottenere gli aggiornamenti automatici per le versioni future di Oracle Java 8, sotto Debian.

Puoi controllare la versione di Java sul tuo sistema con questo comando:
java -version

C'è un package nel repository che imposta automaticamente le variabili d'ambiente di Java 8 ed imposta JDK8 come JDK di default. Per installarlo, usare il seguente comando:
apt-get install oracle-java8-set-default
source /etc/profile.d/jdk.sh

Install Oracle Java 8 in Debian via Repo

To add the WebUpd8 Oracle Java PPA repository and install Oracle Java 8 in Debian, use the following commands:
echo "deb http://ppa.launchpad.net/webupd8team/java/ubuntu trusty main" | tee /etc/apt/sources.list.d/webupd8team-java.list
echo "deb-src http://ppa.launchpad.net/webupd8team/java/ubuntu trusty main" | tee -a /etc/apt/sources.list.d/webupd8team-java.list
apt-key adv --keyserver hkp://keyserver.ubuntu.com:80 --recv-keys EEA14886
apt-get update
apt-get install oracle-java8-installer

And that's it, Oracle Java 8 should now be installed and you should get automatic updates for future Oracle Java 8 versions, under Debian.

You can check out the Java version on your system by using these commands:
java -version

There is a package in repository that automatically sets the Java 8 environment variables and sets JDK8 as the default JDK. To install it, use the following command:
apt-get install oracle-java8-set-default
source /etc/profile.d/jdk.sh

Installare MySQL 5.6 su Debian 7

Aggiungi il Repo
wget http://repo.mysql.com/mysql-apt-config_0.3.5-1debian7_all.deb
dpkg -i mysql-apt-config_0.3.5-1debian7_all.deb

Verrà creato un file /etc/apt/sources.list.d/mysql.list che conterrà delle righe simili alle seguenti:
deb http://repo.mysql.com/apt/debian/ wheezy mysql-5.6
deb-src http://repo.mysql.com/apt/debian/ wheezy mysql-5.6

Installa MySql 5.6
apt-get update
apt-get install mysql-server-5.6

Install MySQL 5.6 on Debian 7

Add the Repo
wget http://repo.mysql.com/mysql-apt-config_0.3.5-1debian7_all.deb
dpkg -i mysql-apt-config_0.3.5-1debian7_all.deb

The above package will create a file /etc/apt/sources.list.d/mysql.list which will contain lines like these or similar:
deb http://repo.mysql.com/apt/debian/ wheezy mysql-5.6
deb-src http://repo.mysql.com/apt/debian/ wheezy mysql-5.6

Install MySql 5.6
apt-get update
apt-get install mysql-server-5.6

martedì 14 aprile 2015

Impostazioni lingua locale Tomcat

Per impostare la lingua Locale in Tomcat bisogna modificare il file catalina.sh che si trova nella directory "bin" di Tomcat.

Cercare qualcosa simile a:
JAVA_OPTS="$JAVA_OPTS....."

Alla fine della definizione JAVA_OPTS aggiungere (per Italia):
-Duser.language=it -Duser.region=IT

Ed otterrai qualcosa simile a:
JAVA_OPTS="$JAVA_OPTS -Duser.language=it -Duser.region=IT"

Set Tomcat default locale

To set default Locale in Tomcat you should edit the catalina.sh file found in the "bin" directory of Tomcat installation.

Look for something like:
JAVA_OPTS="$JAVA_OPTS....."

At the end of the JAVA_OPTS definitions add (for Enligh):
-Duser.language=en -Duser.region=EN

You'll get something like:
JAVA_OPTS="$JAVA_OPTS -Duser.language=it -Duser.region=IT"

venerdì 27 marzo 2015

Ivy and Jasper Reports

Jasper Reports uses dependencies that for some reason are not present on repository. To solve this problem I've configured Ivy as following:

ivy.xml
 <dependency org="net.sf.jasperreports" name="jasperreports" rev="6.0.3" conf="*->default" />  


ivysettings.xml
 <ibiblio name="jaspersoft-third-party" usepoms="true" m2compatible="true"  
 root="http://jaspersoft.artifactoryonline.com/jaspersoft/third-party-ce-artifacts" />  

Ivy e Jasper Reports

Jasper Reports utilizza delle dipendenze che per qualche motivo non si trovano sul repository. Per risolvere il problema ho dovuto configurare Ivy nel seguente modo:

ivy.xml
 <dependency org="net.sf.jasperreports" name="jasperreports" rev="6.0.3" conf="*->default" />  


ivysettings.xml
 <ibiblio name="jaspersoft-third-party" usepoms="true" m2compatible="true"  
 root="http://jaspersoft.artifactoryonline.com/jaspersoft/third-party-ce-artifacts" />  

martedì 27 gennaio 2015

Vaadin Visual Editor on Windows 8.1

To solve this problem add the following line on eclipse.ini
-Dorg.eclipse.swt.browser.XULRunnerPath=C:\

Vaadin Visual Editor su Windows 8.1

Per risolvere il problema aggiungere la seguente riga al file eclipse.ini
-Dorg.eclipse.swt.browser.XULRunnerPath=C:\

venerdì 23 gennaio 2015

Microsoft HoloLens: realtà aumentata e ologrammi nel futuro del computer

Microsoft ha svelato un futuristico accessorio che riuscirà a competere con Google Glass e Oculus Rift. Rivolto sia all'utente occasionale che al gamer, HoloLens è il primo computer olografico indipendente al mondo. Nell'evento di presentazione di Microsoft Windows 10 si è parlato anche del futuro del computer, in un'era in cui diventa sempre più personal. A questo proposito, Microsoft ha mostrato HoloLens, quello che definisce come il primo computer olografico indipendente al mondo.
Windows Holographic

HoloLens 
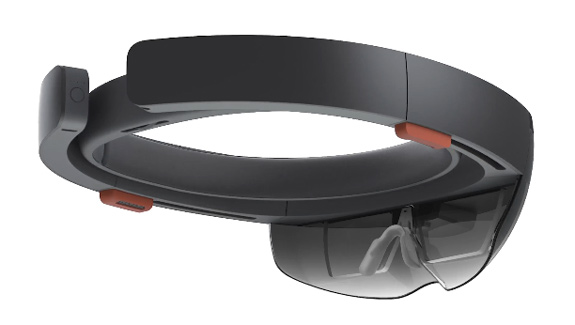
è un casco per la realtà aumentata in cui l'ambiente circostante prende vita grazie a tutta una serie di API che Microsoft chiama Windows Holographic. Abbinando i sensori e microchip del visore (fra cui la Holographic Processing Unit, non meglio definita) che sta al centro del sistema, alle tecnologie software permesse dalle nuove API, l'utente può interagire con elementi tridimensionali ricreati nello spazio circostante.
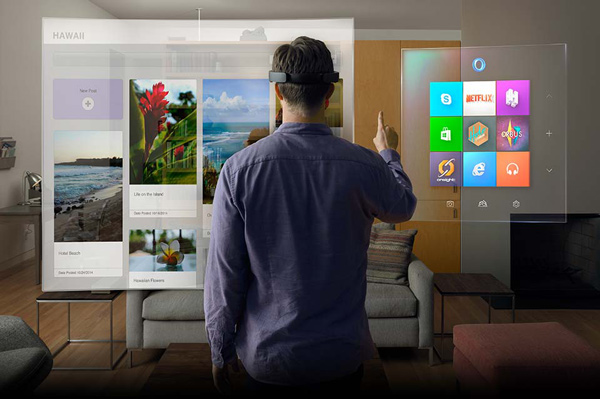
HoloLens

Quando indosserà HoloLens, o qualsiasi casco compatibile con le tecnologie Windows Holographic, l'utente si troverà all'interno di uno spazio virtuale che fa anche da "interfaccia operativa". I vari elementi, definiti ologrammi, sono anche applicazioni Windows universali (e viceversa) che gli stessi sviluppatori possono abilitare al poco convenzionale ambiente di lavoro. HoloLens funziona in maniera indipendente, caratteristica su cui Microsoft ha battuto molto in fase di presentazione: non deve essere collegato al PC o allo smartphone e non ha bisogno di alcun cavo. Va semplicemente indossato.
468x60

Cerca su Google

Cerca nel Blog con Google